It had to be simple – I didn’t want a lot of options or stuff to fill in. Just a quick way to map out the actions for my day. It had to be flexible – Even though I know what tasks or actions I want to perform during the course of my day, things invariably come up. So it needed to be able to fit these items in, without interrupting the flow. It would not be time-based – I have other ways of covering time-based stuff. I wanted it to be strictly a priority-based flow of actions for the day. It would not be project based – Like with time-based stuff, I already had a way of tracking projects. This would be a flow of tasks for the day that may involve several projects and contexts.
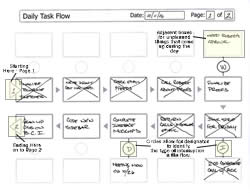
A Task Flow Map is Born I played around with several methods, and many were way too complex. One great approach is Chris Brogan’s post on Mini Process Flows. It had some ideas with a similar flavor to what I wanted to achieve. But being lazy when it comes to writing things out, I wanted an even simpler approach. My goal was to create a basic form that I could fill out at the start of each day, that would map each of my tasks or actions in the order I wanted to complete them. The worksheet I came up with has a set of boxes, one for each task, with a small arrow indicating the flow from one box, and task, to the next. The picture below shows a sample marked up worksheet (click to enlarge). The first box has an arrow box for the current page number and the last box has one for the “continued on” page. So if I have more than 10 actionable tasks in a day, I continue on to a new sheet. In order to accommodate things like waiting for, interruptions, unplanned meetings, and deferred tasks, I added adjacent boxes attached with a dotted line. I also included a small circle to designate the type of interrupt. Some of the ones I use most often include:
“W” = Waiting for or @Waiting. “I” = General interruption, including phone calls I had to take, unplanned meetings, going out for lunch, etc. “D” = Deferred items, tasks that I decided to put off for some (probably good) reason. “P” = Pawned off on someone else.
The idea is to have a readily available map of my day, with each task laid out and flowing into the next. As I complete a task, I cross out the box. Originally I had checkbox to mark off completed items, but it wasn’t nearly as gratifying as crossing out the whole thing. As the day progresses I can clearly see what I’ve completed and what is still left to do. If I am unable to complete all the tasks by the end of the day, I simply begin where I left off the next day, and then start a fresh page for the new tasks for that day. I’ve recently began combining the Task Flow worksheet with a modified version of the DYI Planner project form. I use the project form to track overall progress for each project, and then load up the Task Flow form with the tasks I need to compete each day. It’s helped tremendously in simplifying my process. For me, in order for a system to be useful, it has to be simple – something that doesn’t just add more overhead to my day. Having a way of tracking tasks that is clear and direct, and that still allows me to work in my preferred manner, has helped me to create a system that I actually use. Task Flow Worksheet – PDF Format Tony D. Clark writes, draws cartoons, designs software and websites, and spends a lot of time talking others into working from home, being creative, and doing what they love. His blog Success from the Nest focuses on helping parents who want to do meaningful work from home and have more time for their families, and their dreams.
